The Payroll Edit Register lets you check entries prior to actually processing the entries. Errors can be detected and corrections made before the payroll is processed and distributed.
You can select all transactions for the edit or only those associated with a specific or range of day or weeks. This feature is used when time is entered on a daily basis and processed weekly, bi-weekly, or other pay frequency.
Use this report to visually verify payroll transactions. The Group Number listed on the Edit Register is required to change a transaction in Payroll Entry.
The Payroll Edit must be run for all timecard import records prior to running the Processing Proof report. Any imported records that have errors will not process through to the proof.
List Sequence
Payroll information displays in the order it was entered, employee number sequence, or employee within job sequence. Select the sequence that best suits your needs.
Using employee number sequence groups all transactions for an employee together for easy verification. If your payroll default values are set to flag hours in excess, and you want to review hours in excess, you must run this edit in employee number sequence.
You should check to be certain that the total hours entered agrees with your control total and that transactions have been charged to the proper Job Cost distribution or General Ledger accounts.
Selected Transactions
The Payroll Edit Register cannot be run for transactions once you have selected those transactions for processing. The payroll process begins when you run the Payroll Proof option on the Payroll Processing Menu. Review the Clear options on the Processing Menu for information on how to make selected records accessible again for this report.
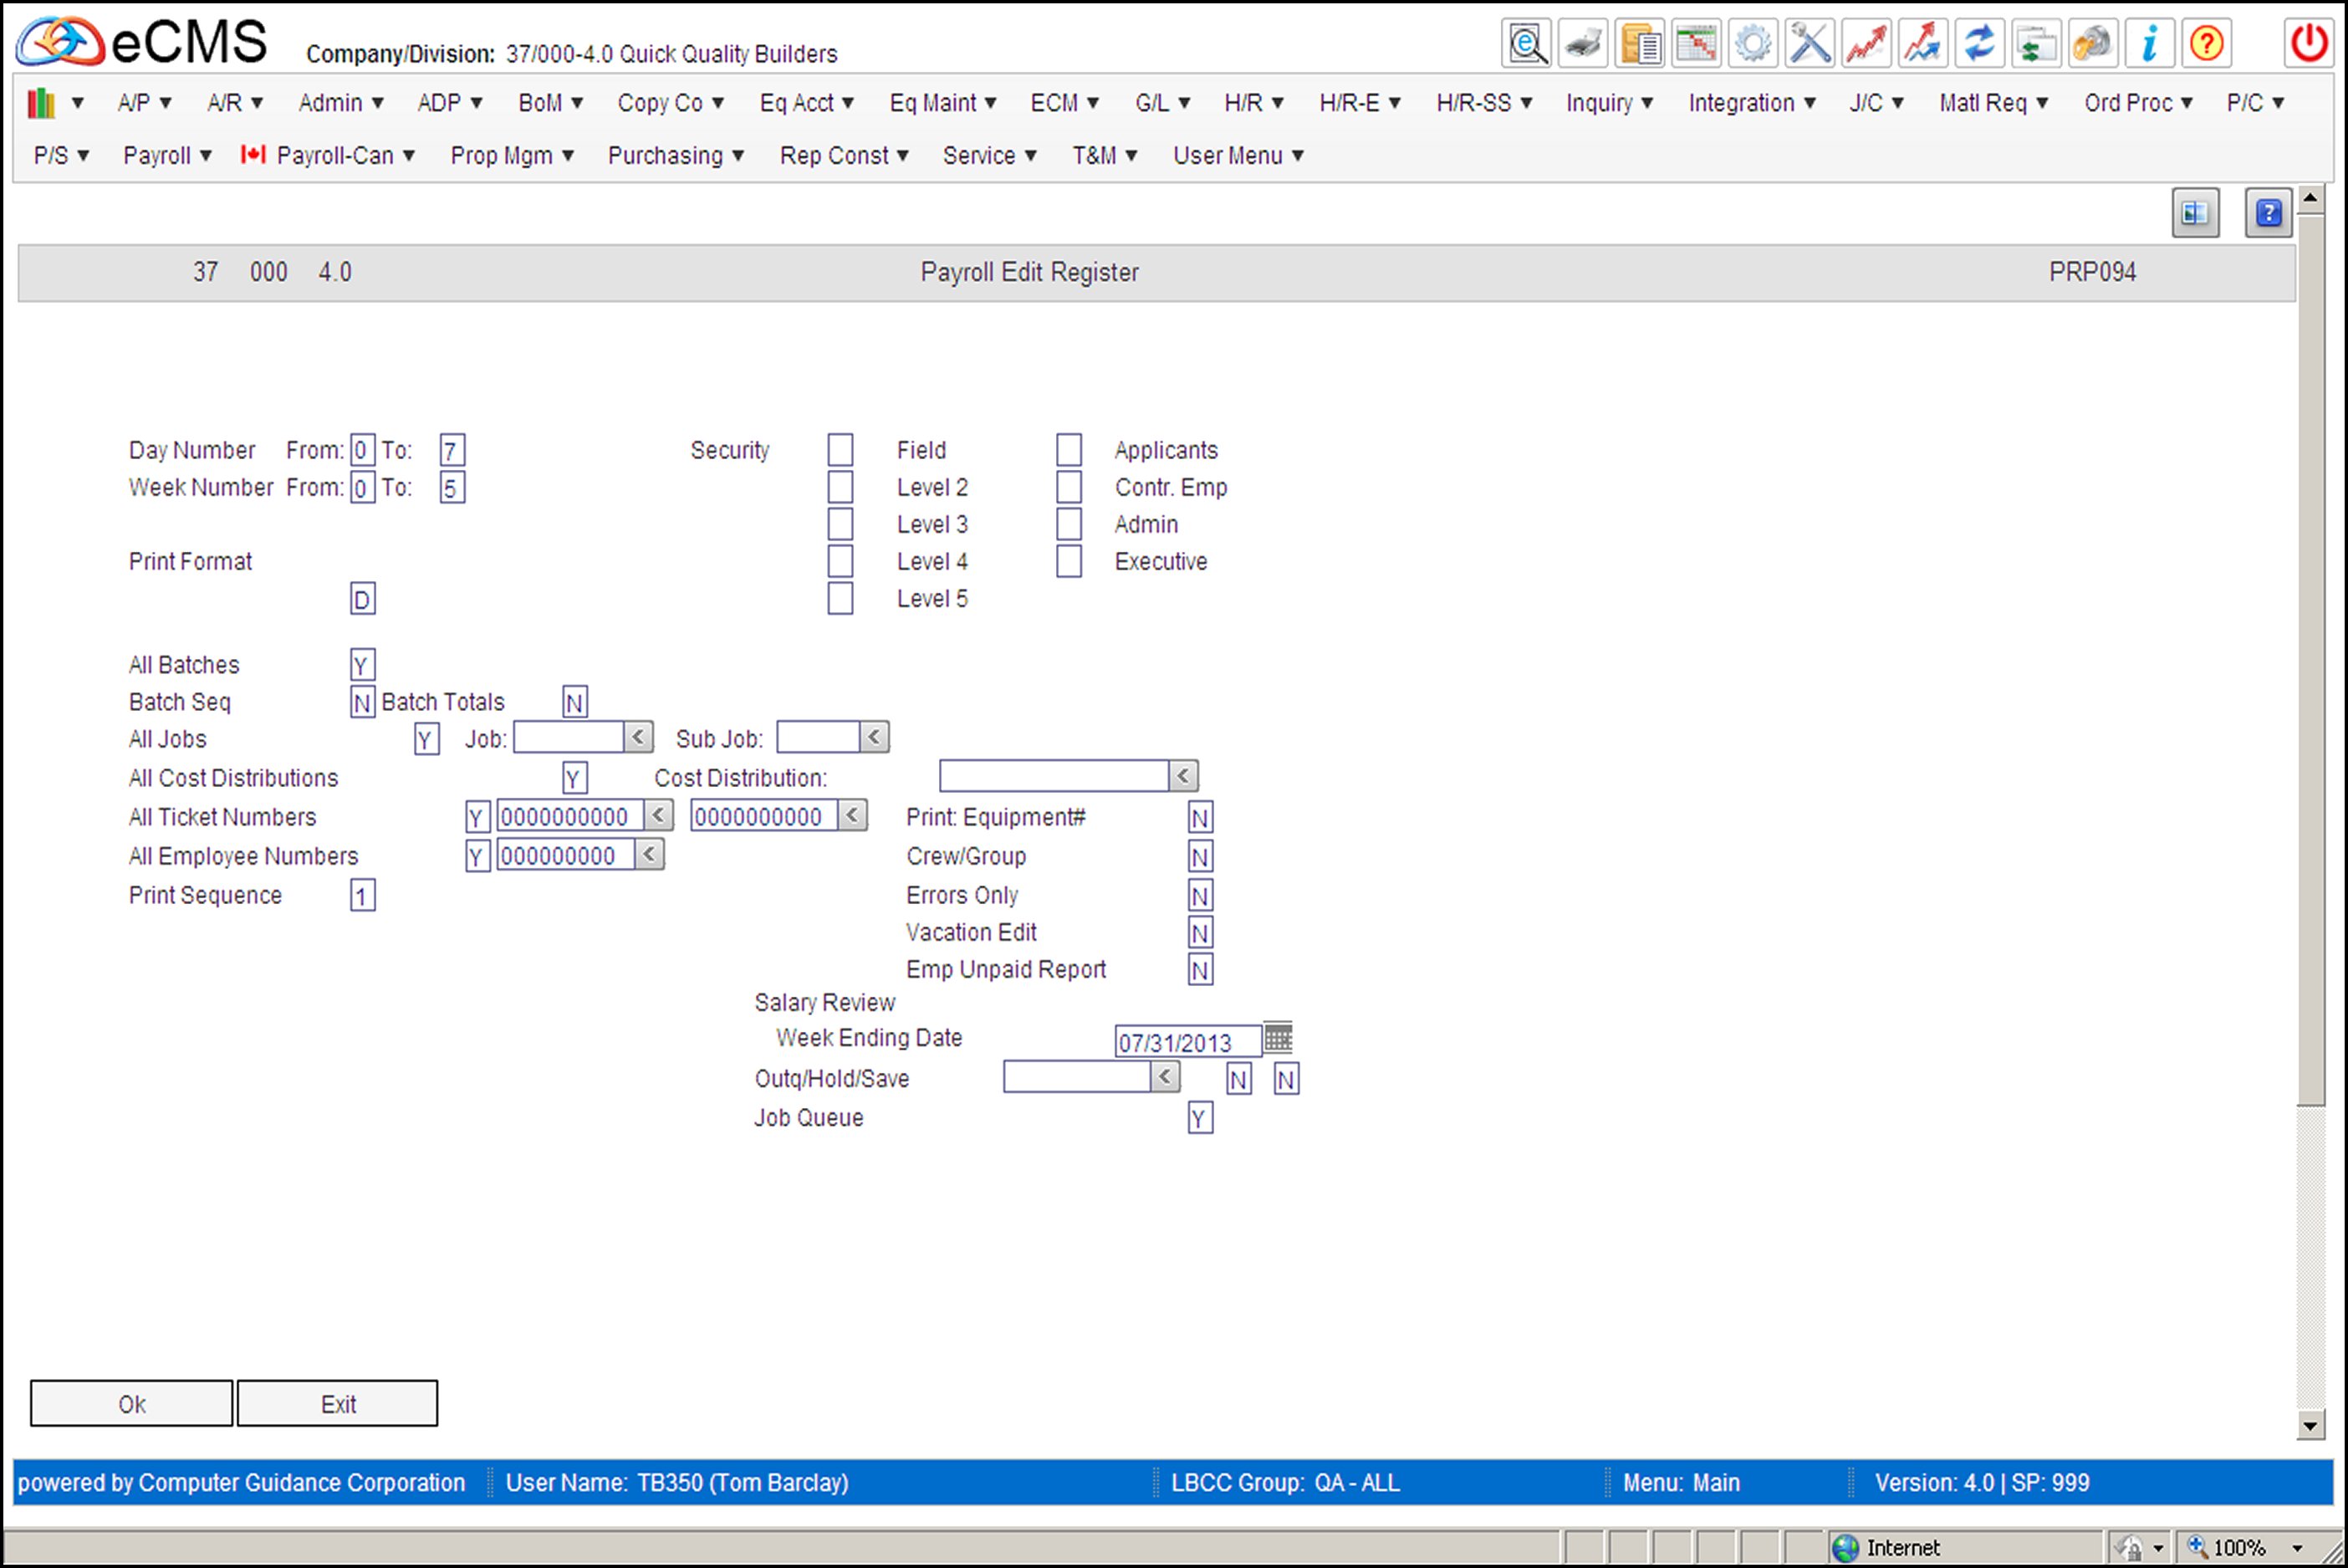
Edit Register Selection screen
Day Number
Use the From/To fields to define a range of days to include on the Edit, or accept the default entries, and 7 to include all days. Specify a single day by entering its number in both fields.
Week Number
Use the From/To fields to define a range of weeks to include on the Edit, or accept the default entries, 0 and 5, to include all weeks. Specify a single week by entering its number in both fields.
Security Level
Select the Security Levels you wish to process. The levels displayed are determined by the User's LBCC setup.
Print Format
Enter a code from the list provided to determine in which format you want the Edit Register to print. If you entered data using the Weekly Time Card Entry screen, it is much easier to edit the data when it is printed in the same format.
D |
Daily format listing. |
W |
Weekly format listing. This format will not display Equipment Numbers. |
All Batches
Y |
Print all payroll batches generated within the criteria entered above. |
N |
The Batch Selection screen displays when you click OK to accept all selections. |
Batch Sequence
Y |
List the edit in batch number sequence. |
Batch Totals
Y N |
Print the batch totals. Will not print the batch totals. |
All Job/Sub Jobs
Y N |
Include all Jobs/Sub Jobs on the Edit. Include only those Jobs/Sub Jobs that fall within the range specified in the adjacent Job and Sub Job fields. |
All Cost Distributions
Y N |
Include all Cost Distributions on the Edit. Include only the Cost Distribution specified in the adjacent Cost Distribution field. |
All Ticket Numbers
Y N |
Include all Ticket Numbers on the Edit. Include only the Ticket Numbers that fall within the range defined in the adjacent fields. To limit the range to a single Ticket Number, enter that number in both fields. |
All Employee Numbers
Y N L |
Include all Employee Numbers on the Edit. Include only the Employee specified in the adjacent field. Include only Employee transactions posted by the operator whose Employee Number is specified in the adjacent field. If multiple operators are entering payroll time transactions, this option allows individual edit reports to be printed for each operator. Each individual report contains only those transactions entered by the requesting operator. This provides each operator with the opportunity to verify only their own transactions. |
Print Sequence
1 2 3 4 5 6 |
Print the Edit in employee number sequence. Print the Edit in the same sequence in which the entries were made. Print the Edit in Job Number sequence. Print the Edit in Employee Class sequence. Print the Edit in Department Number sequence. Print the Edit in Alpha Employee sequence. |
Print Equipment Number
Y |
Print Equipment number. This is not available when using the Weekly format option. |
Crew Group
Y |
Print the Crew number with the Group number. |
Errors Only
Y |
Print only those detail records that have errors associated with them. |
Vacation Edit
Y |
The Vacation Edit Register will only print if there were vacation hours entered through Payroll Entry. |
Emp Unpaid Report
Y |
Print a report that lists active employees (employee number and name) that do not have time entered for them for the weeks or pay type you specify. Unlike the Edit Register (which prints based on the Pay Type, Week Number, and Day Number), the Unpaid Employee report prints according to Pay Type and Week Number only. This means that a specified week will not print if it contains at least one day with time entered. |
Example: Assume you have time entered for an Employee for only for day 7 of week 1, and you specify days 1-5 of week 1 for the Edit Register. In this case, the Edit Register prints for days 1-5 of week 1, assuming that the selected Pay Type is valid. The Unpaid Employee report, on the other hand, does not include that Employee because week 1 contains time entered (day 7).
Salary Review Week Ending Date
Enter the week ending date through which salary review data should be listed.
Note: This option is valid only if the Human Resources application is installed.
Outq/Hold/Save
Enter an Outq identifier to have this report sent to a specific output queue. Leave this field blank to send the Edit to the default output queue.
Enter Y in the Hold field to place this report on hold in the default, or specified, output queue.
Enter Y in the Save field to print the report and then place it on hold in the default, or specified, output queue.
Job Queue
Y |
Submit the Edit for processing in the job queue. |
N |
Process the Edit ahead of other jobs that are in the job queue. |
Click to process these entries and print the Edit Register. An error message will be generated if the system does not find a Medicare or Federal record set up in the Distribution file. |
|
Click to return to the Main Menu without saving changes. |
![]()